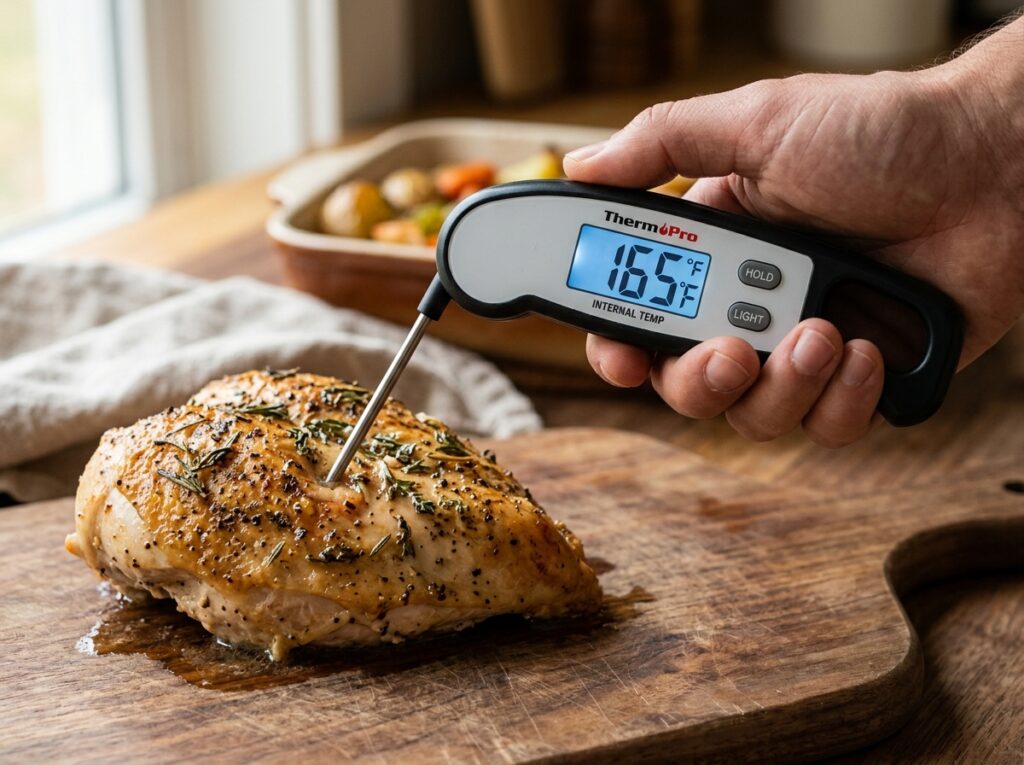
How to Read a Meat Thermometer — A Simple Guide
A few degrees can be the difference between a perfectly juicy chicken breast and a dry, overcooked disappointment — or worse, a trip to the ER with food poisoning. Sounds dramatic? The CDC estimates that roughly 48 million Americans get sick from foodborne illness every year, and undercooked meat is one of the biggest culprits. That tiny little gadget sitting in your kitchen drawer — your meat thermometer — is honestly your best defense.
But here’s the thing. Plenty of people own a meat thermometer and still don’t use it correctly. They poke it in the wrong spot, read it at the wrong time, or just stare at the dial with zero clue what the numbers actually mean. If that sounds familiar, don’t worry. You’re about to learn exactly how to read a meat thermometer — and more importantly, how to trust what it tells you.
Why You Actually Need a Meat Thermometer
Let’s be real for a second. A lot of home cooks rely on guesswork. They press the steak with their thumb, cut the chicken open to “check the color,” or just go by time alone. And sometimes, sure, it works out. But sometimes it doesn’t.
Color isn’t a reliable indicator of doneness. The USDA has confirmed this multiple times — ground beef can turn brown before it reaches a safe internal temperature, and poultry can look pink even when it’s fully cooked. Time-based cooking is also tricky because every oven heats differently, every cut of meat varies in thickness, and starting temperatures change based on whether you pulled your steak straight from the fridge or let it sit on the counter for 30 minutes.
A meat thermometer removes all that guesswork. It gives you an exact number, and that number tells you two things: Is this safe to eat? And is it cooked to the doneness I actually want?
If you’ve ever struggled with figuring out whether pork tenderloin can be pink inside, or wondered if 145°F is truly safe for chicken, a thermometer gives you your answer — no debate needed.
Types of Meat Thermometers (And How Each One Works)
Before you can read a meat thermometer properly, you need to know which type you’re dealing with. They all measure temperature, but the way they display it — and how fast they respond — varies a lot.
Dial (Analog) Thermometers
These are the old-school ones your grandmother probably used. A long metal probe connects to a round dial face at the top. The needle moves along a numbered scale as the temperature changes.
Reading one is straightforward — you look at where the needle points and match it to the number on the dial. Most analog thermometers show both Fahrenheit and Celsius on the same face. The outer ring is usually Fahrenheit, and the inner ring is Celsius.
There’s a catch, though. Dial thermometers are slow. They can take 15 to 20 seconds to settle on a final reading. And the sensing area isn’t just at the tip — it’s usually the bottom two inches of the probe. That means you need to insert the probe deep enough for those two inches to sit in the thickest part of the meat. If your cut is thin (like a pork chop or a burger patty), a dial thermometer isn’t your best option.
Pro Tip: Most dial thermometers have a small hex nut on the back of the face. You can use pliers to calibrate it — stick the probe in ice water and adjust the needle to 32°F (0°C). Do this every few months to keep readings accurate.
Digital Instant-Read Thermometers
These are the ones you see every food blogger and pitmaster raving about, and honestly, the hype is deserved. You stick the probe into the meat, and within 2 to 5 seconds, a digital screen shows you the exact temperature.
Reading a digital thermometer is about as simple as it gets. The number on the screen is your temperature. No squinting at tiny lines, no waiting for a needle to stop wobbling. Most models let you toggle between Fahrenheit and Celsius with a button.
The sensing point on a digital instant-read is right at the very tip of the probe — just the last few millimeters. That makes it much better for thin cuts and for pinpointing the exact center of thick roasts.
One important thing: instant-read thermometers aren’t designed to stay in the meat while it cooks. You pull the meat out (or open the oven), insert the probe, get your reading, and remove it. If you leave a standard instant-read in a 400°F oven, you’ll destroy the electronics.
Leave-In (Oven-Safe) Thermometers
These are built to stay inside the meat for the entire cooking time. Some are analog with an oven-safe design, and some are digital with a probe that goes inside the oven while the display unit sits outside, connected by a heat-resistant wire.
The digital leave-in versions are especially handy. You set a target temperature, and the unit beeps when the meat hits that number. No opening the oven door repeatedly, no guessing, no stress.
Reading one is simple — you just monitor the display. The number climbs as the meat cooks. When it gets close to your target, start paying close attention because those last few degrees can go by quickly.
Wireless and Smart Thermometers
These are the newest players. Brands like MEATER, ThermoWorks Signals, and FireBoard make probes that connect to your phone via Bluetooth or Wi-Fi. You can monitor your brisket’s internal temperature from the couch while watching a game.
The reading shows up on an app, and most apps also estimate how much longer your cook will take based on the rate of temperature change. Some even track ambient temperature (how hot the oven or grill is) alongside the meat’s internal temp.
These are excellent tools, but they’re also the most expensive option. If you’re doing long cooks — smoking a pork butt to the right internal temperature, for example — they’re worth every penny.
How to Read a Meat Thermometer (Step by Step)
Alright, let’s get into the actual mechanics of reading your thermometer correctly. This applies to any type, but I’ll note differences where they matter.
Step 1 — Find the Thickest Part of the Meat
Your thermometer tells you the temperature at one specific point. So you need that point to be the coldest spot — the area that takes the longest to cook. That’s almost always the geometric center of the thickest section.
For a whole chicken or turkey, that means the innermost part of the thigh, near the joint. For a steak or pork chop, insert the probe from the side, going horizontally into the center. For a roast, go straight into the middle.
Step 2 — Insert the Probe Correctly
For digital instant-read thermometers, push the probe tip into the center of the thickest part. You only need to go about half an inch to an inch deep — just enough for the sensor at the tip to be fully surrounded by meat.
For dial thermometers, remember that the sensing area covers the bottom two inches of the probe. So push it in at least 2 to 2.5 inches deep. If the meat isn’t thick enough for that, a dial thermometer won’t give you an accurate reading. Switch to an instant-read.
For leave-in probes, position the probe before cooking starts. Push it into the center of the thickest section and make sure the tip isn’t touching bone, fat, or the pan. All three of these conduct heat differently than muscle tissue and will give you a false reading — usually higher than the actual meat temperature.
Step 3 — Wait for the Reading to Stabilize
This is where patience matters.
Digital thermometers usually stabilize within 2 to 5 seconds. You’ll see the number jump around a bit and then settle. That settled number is your reading.
Dial thermometers take longer — sometimes 15 to 20 seconds. Don’t pull it out the moment the needle starts moving. Wait until it stops completely.
A common mistake is reading too quickly. If you pull the thermometer out after just one second, you’re reading the temperature of the outer layer of meat, not the center. That outer layer could be 20 or 30 degrees hotter. Give it time.
Step 4 — Read at Eye Level (For Dial Thermometers)
This might seem like a small detail, but it actually matters for analog dials. If you look at the dial from an angle, parallax error can throw off your reading by several degrees. Hold the thermometer so the dial face is directly at your eye level, and read the number the needle points to.
Digital displays don’t have this problem. The number is the number, no matter what angle you’re looking from.
Step 5 — Check Multiple Spots
One reading isn’t always enough, especially for large or irregularly shaped cuts. A whole turkey, for example, should be checked in the thigh, the breast, and the thickest part of the wing joint. A large pork tenderloin might be thicker on one end than the other.
Take readings in two or three spots. The lowest number is your actual doneness, because that’s the part that’s least cooked.
Safe Internal Temperatures You Should Know
Knowing how to read the thermometer is only half the equation. You also need to know what temperature you’re aiming for. The USDA sets minimum safe internal temperatures for different proteins, and these numbers exist for a reason — they’re the point at which harmful bacteria like Salmonella, E. coli, and Listeria are killed.
Poultry (chicken, turkey, duck): 165°F (74°C) — always. No exceptions, no “I like it a little pink.” Poultry needs to hit 165°F. If you’ve ever dealt with chicken that’s chewy or weirdly textured, undercooking is often part of the problem.
Ground meats (beef, pork, lamb): 160°F (71°C). Because grinding mixes surface bacteria throughout the meat, ground products need a higher temp than whole cuts.
Whole cuts of beef, pork, lamb, and veal: 145°F (63°C) with a 3-minute rest. This applies to steaks, roasts, and chops. The rest time is important — we’ll talk about why in a minute.
Fish and shellfish: 145°F (63°C).
Ham (pre-cooked, reheating): 140°F (60°F). If you’re reheating a honey baked ham, this is the number to watch.
These are minimum safe temperatures. You can always cook higher. A lot of steak lovers prefer medium-rare at 130–135°F, which is technically below the USDA recommendation for whole cuts — but since bacteria on whole steaks live on the surface (which gets seared at very high heat), many experts and chefs consider it safe. Ground beef is a different story entirely. Don’t serve a burger at 130°F.
Understanding Carryover Cooking
Here’s something that trips up a lot of people: your meat keeps cooking after you take it off the heat. This is called carryover cooking, and it can raise the internal temperature by 5 to 15 degrees depending on the size of the cut and how hot your cooking environment was.
A thick ribeye pulled from a screaming hot grill at 130°F might coast up to 135–140°F while it rests. A whole turkey pulled at 160°F in the breast could easily reach 165°F during its resting period.
So what does this mean for reading your thermometer? It means you should pull your meat a few degrees before your target temperature. If you want medium-rare beef at 135°F, pull it at 128–130°F. If you want pork chops at 145°F, pull them at 140°F.
This takes a little practice. Thicker cuts carry over more than thin ones. High-heat cooking methods (grilling, searing) cause more carryover than low-and-slow methods (smoking, braising). Over time, you’ll develop an intuition for it.
Quick Fact: Carryover cooking happens because the outer layers of meat are much hotter than the center. During the rest period, that heat redistributes inward, raising the core temperature even though no external heat source is present. It’s basic thermal physics, but it has real, tasty consequences.
Common Mistakes That Mess Up Your Reading
Getting a wrong reading isn’t always the thermometer’s fault. Here are the most common user errors I’ve seen (and made myself, honestly).
Touching Bone, Fat, or the Pan
Bone conducts heat faster than meat. Fat renders at high temperatures and can read hotter than the surrounding muscle. The bottom of a roasting pan is in direct contact with the heat source. If your probe tip touches any of these, your reading will be misleadingly high, and you’ll pull the meat too early.
Always position the probe so it sits in the center of the thickest muscle, away from bones and fat pockets.
Not Calibrating Your Thermometer
Thermometers drift over time, especially dial models. If your thermometer is off by 5 or 10 degrees, that’s a significant margin when food safety is on the line.
Calibrate using the ice water method: fill a glass with ice, add cold water, stir, and insert the probe. It should read 32°F (0°C). If it doesn’t, adjust (dial models) or note the offset (digital models). Some digital thermometers have a calibration button. Check your manual.
Opening the Oven or Grill Too Often
Every time you open the door, you lose 25 to 50 degrees of ambient heat. The oven then works harder to recover, and your cook time extends. If you’re using an instant-read and checking every five minutes, you’re actually slowing down the cooking process.
This is one of the best arguments for a leave-in probe. Set it, close the door, and monitor from outside.
Checking Way Too Early
A 5-pound turkey you’re cooking at 350°F isn’t going to be done in 30 minutes. If you know the approximate cook time for your cut, don’t bother checking until you’re at least 75% of the way through that estimate. Constant early checking doesn’t speed anything up — it just lets heat escape and makes you anxious.
Special Situations: How to Temp Different Cuts
Not every piece of meat is shaped like a textbook illustration. Let’s talk about how to handle some real-world scenarios.
Whole Chicken or Turkey
Check the innermost part of the thigh first — that’s the last place to reach safe temperature. Insert the probe between the thigh and the breast, angling it toward the thickest part of the thigh meat, avoiding the bone. Then check the thickest part of the breast. Both should read at least 165°F.
Thin Cuts (Burgers, Pork Chops, Chicken Breasts)
For cuts that are only an inch or two thick, insert the probe from the side, going horizontally so the sensor can sit in the true center. If you go in from the top on a thin cut, the probe will likely push through to the bottom and give you a pan temperature, not a meat temperature.
If you’re baking chicken breast at 350°F and wondering when it’s done, this side-insertion technique is your best friend.
Irregular Shapes (Pork Tenderloin, Chicken Drumsticks)
Pork tenderloin tapers from thick to thin. Check the thickest end — that’s the slowest to cook. If the thick end reads 145°F, the thin end is almost certainly above that.
Chicken drumsticks baking at 400°F can be tricky because of the bone running through the center. Insert the probe into the meatiest part of the drumstick, making sure you stay in muscle tissue and don’t touch the bone.
Steaks
For steak, go in from the side, targeting the center. If you’re dealing with a thick cut like a tomahawk steak, you’ve got plenty of meat to work with. For thinner steaks, an instant-read with a thin probe is essential.
And remember — for steaks, carryover cooking is significant. Pull your steak 5 degrees below your target and let it rest.
How to Read a Meat Thermometer for Different Doneness Levels (Beef)
If you’re cooking beef steaks or roasts, the “done” temperature isn’t one fixed number. It depends on your personal preference. Here’s a quick reference:
Rare: 120–125°F — cool red center, very soft texture. Pull from heat around 115–120°F.
Medium-Rare: 130–135°F — warm red center, slightly firmer. Pull at 125–130°F. This is what most steakhouse chefs consider the sweet spot.
Medium: 135–145°F — warm pink center. Pull at 130–140°F.
Medium-Well: 145–155°F — slight hint of pink. Pull at 140–150°F.
Well-Done: 155°F and above — no pink, firmer texture. Pull at 150°F or higher.
Notice how each range includes a “pull” temperature that’s lower? That’s carryover cooking in action. If you wait until the thermometer reads your target while the steak is still on the grill, you’ll overshoot.
If you’re curious about eating beef at very low temperatures, blue steak is a real thing, and it sits at around 115°F — barely warmed through. It’s not for everyone, but it’s generally considered safe for whole muscle cuts from quality sources.
Caring for Your Meat Thermometer
A thermometer that’s dirty, damaged, or poorly stored won’t give you reliable readings. Here’s how to keep it in top shape.
Clean the probe with hot soapy water after every use. Never submerge a digital thermometer body in water unless the manufacturer says it’s waterproof. For instant sanitizing between different raw proteins (say you’re checking chicken and then beef), wipe the probe with an alcohol swab or a food-safe sanitizer.
Store it in a protective case or sheath. Throwing a thermometer loose in a utensil drawer is a great way to bend the probe or damage the sensor.
Replace the battery when the display starts to dim. A low battery can actually affect reading accuracy on some models.
And calibrate. I’ve said it before, but it bears repeating. A thermometer you don’t calibrate is just a decoration with numbers on it.
FAQ
Can I leave an instant-read thermometer in the oven?
No. Standard instant-read thermometers aren’t oven-safe. The electronic components will melt or malfunction. If you want to monitor temperature during cooking, use a leave-in probe thermometer — either analog (oven-safe dial) or digital with an external display unit.
Where exactly should I insert a meat thermometer in a whole chicken?
The most critical spot is the innermost part of the thigh, near where it connects to the body. Angle the probe away from the bone. You should also check the thickest part of the breast as a second reading. Both locations need to reach 165°F for the chicken to be safe.
How do I know if my meat thermometer is accurate?
Use the ice water test. Fill a glass with crushed ice, top it off with cold water, stir for about 30 seconds, then insert the thermometer probe. It should read 32°F (0°C). If it’s off by more than 2 degrees, calibrate it (if possible) or replace it. You can also test with boiling water — it should read 212°F (100°C) at sea level, though altitude affects the boiling point.
My thermometer shows different readings in different spots of the same piece of meat. Which one is correct?
All of them are technically correct — they’re just measuring different spots. The reading you should pay attention to is the lowest one, because that represents the least-cooked area. If the thickest part of your pork roast reads 138°F and a thinner area reads 155°F, your roast isn’t done yet. The cold spot needs to hit your target temperature.
Do I really need a meat thermometer if I’ve been cooking for years?
Experienced cooks still misjudge doneness. Studies have shown that even professional chefs sometimes over- or under-cook meat when they rely solely on touch, timing, or visual cues. A thermometer isn’t a crutch — it’s a precision tool. Even Gordon Ramsay uses one. There’s no ego in food safety.
Your Thermometer Is Only as Good as the Person Holding It
Owning a meat thermometer is step one. Knowing how to read it — and where to place it, when to check, and what numbers to look for — that’s where the real skill lives. Once you get the hang of it, you’ll cook with so much more confidence. No more cutting into a beautiful steak just to “check.” No more guessing if the chicken is done. No more anxiety about serving undercooked meat to your family.
Pick up your thermometer next time you cook. Use it deliberately. Check the thickest part, wait for the reading to settle, and trust the number. Within a few cooks, it’ll feel like second nature. And your food? It’ll be noticeably, consistently better — every single time.