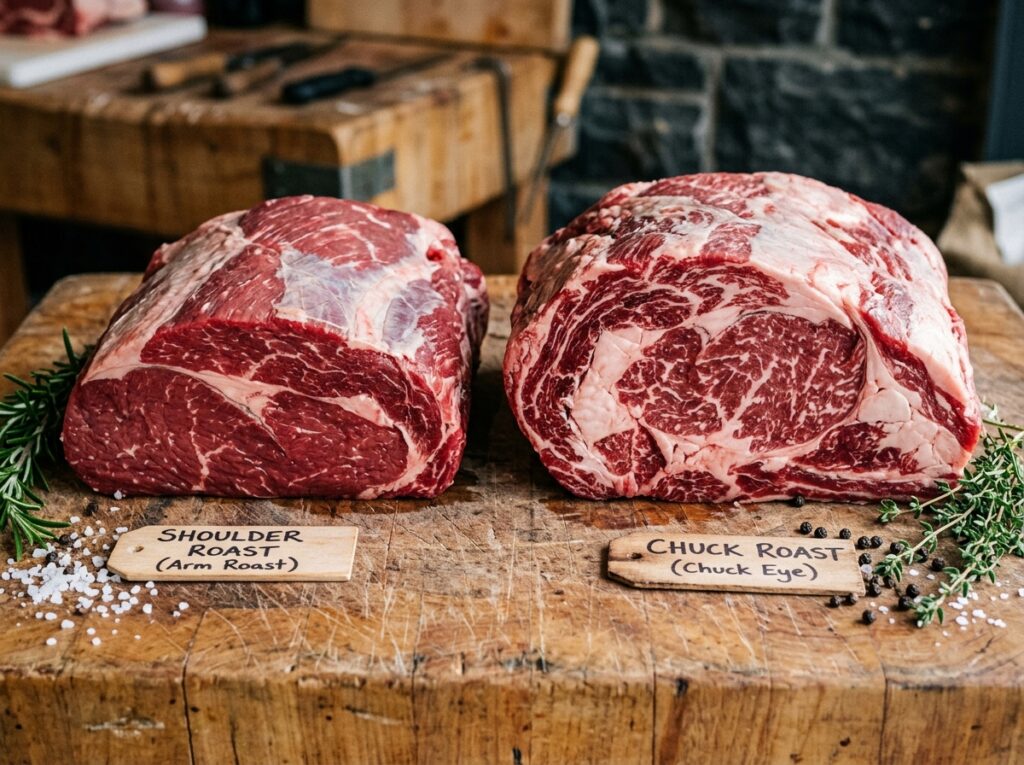
Shoulder Roast or Chuck Roast? Pick the Right Cut
Both cuts come from the front half of the cow. Both are tough. Both get incredibly tender when you cook them low and slow. And yet, shoulder roast and chuck roast are not the same thing — and picking the wrong one can mean the difference between a melt-in-your-mouth pot roast and a dry, disappointing dinner.
Most people standing at the butcher counter have the exact same question: “Aren’t these basically the same?” They look similar, they’re priced similarly, and the labels don’t help much either. But once you understand where each cut actually comes from, how the fat is distributed, and what happens during cooking, the choice becomes pretty straightforward.
This guide breaks down the real differences between shoulder roast and chuck roast — flavor, texture, fat content, best cooking methods, and which one you should grab depending on what you’re making tonight.
Where Do These Cuts Actually Come From?
Here’s where the confusion starts. Both shoulder roast and chuck roast come from the beef chuck primal, which is the large section covering the neck, shoulder blade, and upper arm of the cow. But they’re cut from different spots within that region, and that matters more than you’d think.
Chuck roast (sometimes labeled as chuck roll roast or center-cut chuck roast) comes from the neck and shoulder blade area. It sits right around the shoulder blade bone and includes several muscles that the cow uses regularly for movement. Because of that constant use, the meat is packed with connective tissue and intramuscular fat — what butchers call marbling.
Shoulder roast (also called shoulder clod roast, arm roast, or English roast) is cut from the lower shoulder and upper foreleg area. It’s a leaner cut that sits below the chuck, closer to the leg. The muscles here are worked hard too, but the fat distribution is very different — there’s less marbling running through the meat and more of the fat sits on the outside or in seams between muscles.
Think of it this way: if the entire front shoulder of a cow is a neighborhood, chuck roast lives upstairs near the neck and blade, while shoulder roast lives downstairs near the arm. Same neighborhood, different houses, different vibes.
Quick fact: The beef chuck primal makes up roughly 26% of the animal’s total carcass weight, making it one of the largest primal cuts. That’s why you’ll find so many sub-cuts within it — blade steak, flat iron, Denver steak, chuck eye, and of course, our two roasts.
Fat Content and Marbling: The Biggest Difference
If there’s one thing that truly separates these two cuts, it’s the fat. And fat, as any experienced cook will tell you, is flavor.
Chuck roast is significantly more marbled. Those white streaks of fat running through the meat don’t just look pretty — they melt during slow cooking and basically baste the meat from the inside out. That’s why chuck roast almost always turns out juicy, rich, and fork-tender when you braise it. It’s very forgiving. Even if you slightly overcook it, the intramuscular fat keeps things moist.
Shoulder roast is leaner. The fat tends to sit in distinct pockets or along the exterior rather than being woven throughout the muscle fibers. That means you get a cleaner, more “beefy” flavor, but you also lose some of that automatic moisture insurance. Shoulder roast requires a little more attention during cooking. If you let it go too long without enough liquid, or if you cook it at too high a temperature, it can dry out faster than chuck.
Here’s a rough comparison per 3-ounce cooked serving:
Chuck roast — approximately 22–24g of fat, 230–260 calories
Shoulder roast — approximately 12–15g of fat, 180–210 calories
So if you’re watching your fat intake or counting calories, shoulder roast gives you a meaningful advantage. You still get a solid chunk of protein (both cuts deliver around 23–26g per serving), but with noticeably less fat.
Pro Tip: If you choose shoulder roast for a slow braise, add a bit of extra cooking liquid — broth, wine, even beer — to compensate for the lower fat content. The meat absorbs that liquid beautifully and stays tender.
Flavor Profile: Rich vs Clean
Flavor is subjective, sure. But there’s a real, measurable difference between how these two cuts taste, and it all goes back to fat and connective tissue.
Chuck roast delivers that deep, rich, almost buttery beef flavor that most people picture when they think of a classic Sunday pot roast. The melted fat and broken-down collagen create a silky, unctuous mouthfeel. The drippings from a braised chuck roast make an incredible gravy practically on their own — thick, glossy, and packed with flavor. If you’ve ever had a pot roast that made you close your eyes and sigh, it was probably chuck.
Shoulder roast tastes more straightforwardly beefy. The flavor is clean, honest, and a bit more “meaty” without the richness that heavy marbling brings. Some people actually prefer this — especially if they find heavily marbled roasts too greasy or heavy. Shoulder roast also takes on marinades and rubs really well because the leaner texture absorbs seasoning more effectively.
Neither flavor is “better.” It depends on what you’re going for. A heavy, cold-weather stew with root vegetables? Chuck is your friend. A roast you want to slice thin for sandwiches or serve alongside lighter sides? Shoulder might be the smarter play.
Best Cooking Methods for Each Cut
Both cuts are tough when raw. You can’t grill a shoulder roast or a chuck roast like you would a ribeye. The connective tissue needs time and low heat to break down into gelatin. But the specific methods that work best differ slightly between the two.
Chuck Roast: Born to Braise
Chuck roast is basically made for braising. Sear it hard on all sides in a hot Dutch oven, add your aromatics (onion, garlic, carrots, celery), pour in some beef broth and a splash of red wine, then cover and cook at 300–325°F for 3 to 4 hours. The result is almost unfairly good.
It’s also the go-to cut for the slow cooker. Set it on low for 8 hours with your favorite vegetables, and you come home to a meal that tastes like you spent all day cooking (you didn’t). The heavy marbling means chuck practically braises itself.
Chuck roast also works great for:
- Beef stew (cut into chunks, it holds its shape while getting tender)
- Shredded beef for tacos, burritos, or sandwiches
- Mississippi pot roast (that viral recipe with ranch mix and pepperoncini)
- Beef bourguignon
If you’re making stew and want those chunks to really melt into the sauce, check out the right way to boil potatoes so they cook evenly alongside your beef.
Shoulder Roast: The Slicer’s Cut
Shoulder roast shines when you want sliceable results. Because it’s leaner and has a tighter grain, it holds together better after cooking. Where chuck roast tends to fall apart (great for shredding, not great for neat slices), shoulder roast gives you those clean, beautiful slices you’d see at a deli counter.
Shoulder roast works well for:
- Oven roasting at low temperature (275–300°F) for 4–5 hours
- Slow cooker meals where you want to slice rather than shred
- Smoked beef roast (the leaner profile takes on smoke flavor nicely)
- Italian beef sandwiches where you need thin-sliced meat
One big thing to remember with shoulder roast: don’t skip the sear. Because the cut is leaner, that initial hard sear in a screaming-hot pan is even more important. It locks in the surface moisture and creates a flavorful crust that adds depth to the finished dish.
Pro Tip: Use a reliable meat thermometer for shoulder roast. Pull it when the internal temperature hits 195–205°F for braising, or 145°F if you’re going for a medium-rare oven roast (though this only works with very slow, careful roasting).
Price and Availability: What’s Easier on the Wallet?
Chuck roast is one of the most widely available beef cuts in America. You’ll find it in virtually every grocery store, from Walmart to Whole Foods, and at most butcher shops. Because it’s so popular — especially during fall and winter — stores almost always keep it stocked.
Shoulder roast can be slightly harder to find, depending on your region and store. Some grocery chains label it differently (arm roast, English roast, shoulder clod), which makes it confusing. If you don’t see “shoulder roast” in the meat case, ask the butcher. They might have it in the back or can cut one for you.
Price-wise, both cuts are budget-friendly compared to premium steaks. As of 2025, you can generally expect:
Chuck roast: $6–$9 per pound (conventional), $10–$14 for grass-fed or organic
Shoulder roast: $5–$8 per pound (conventional), $9–$12 for grass-fed or organic
Shoulder roast often costs a dollar or two less per pound than chuck because there’s less demand for it. That makes it a great value pick, especially if you’re feeding a crowd. A 4-pound shoulder roast cooked properly can easily serve 6–8 people with leftovers.
If you’re interested in other great value cuts, you might want to learn about pork cushion meat — another affordable, underrated option that rewards slow cooking.
Texture After Cooking: Falling Apart vs Holding Together
This is where your intended use really dictates which cut to buy.
Chuck roast gets incredibly soft and shreddable. After 3–4 hours of braising, you can pull it apart with two forks. The connective tissue and fat have melted away, leaving behind fibers that separate easily. This is perfect for pulled beef, shredded tacos, or a pot roast where you want the meat to mingle with the vegetables and gravy.
Shoulder roast stays firmer and more structured. It gets tender — absolutely — but it retains enough integrity that you can slice it neatly. The grain is tighter, and the muscle fibers don’t fall apart as dramatically. This gives you more versatility if presentation matters or if you want leftovers that look good in a sandwich the next day.
Here’s a practical way to think about it: if you want your roast to “melt,” buy chuck. If you want your roast to “slice,” buy shoulder.
Which One Should You Actually Buy?
Let’s make this simple. Your choice should come down to three things: what you’re cooking, how you want the texture, and whether you care about fat content.
Go with chuck roast if you’re making:
A classic pot roast with gravy, beef stew, shredded beef tacos, or any dish where you want maximum richness and fork-tender meat that falls apart. Chuck is also the safer choice for beginners because the fat content makes it very forgiving — it’s hard to mess up.
Go with shoulder roast if you’re making:
Sliced roast beef, deli-style sandwiches, a leaner family meal, or smoked beef. Shoulder is also the better pick if you’re calorie-conscious or just prefer a cleaner beef flavor without the heaviness of a fatty cut.
What about substituting one for the other? You absolutely can. They’re close enough that swapping them won’t ruin a recipe. Just adjust your cooking slightly — add more liquid for shoulder roast, and expect a softer, more shreddable texture with chuck. Many experienced home cooks keep both in the freezer and choose based on their mood and menu.
If you enjoy comparing different cuts and understanding what works best where, the breakdown of shank vs butt ham follows a similar logic — two cuts from a similar area with surprisingly different results in the kitchen.
Storing and Reheating Leftover Roast
No matter which cut you choose, you’ll probably have leftovers. Both shoulder roast and chuck roast reheat beautifully if you do it right.
Store leftover roast in an airtight container in the fridge, and it’ll stay good for 3 to 4 days. Keep the meat in its braising liquid or gravy if possible — this prevents it from drying out during storage. For longer storage, both cuts freeze well for up to 3 months. Again, freeze them in their cooking liquid for the best results.
When reheating, low and slow wins again. Put the leftover roast (with its liquid) in a covered dish and warm it in the oven at 300°F for about 20–30 minutes. The microwave works in a pinch — just use 50% power and stir/flip halfway through to avoid rubbery edges.
Did you know? Many home cooks say their pot roast tastes better the next day. That’s not just nostalgia. As the meat sits in its braising liquid overnight, the flavors continue to meld and deepen. The gelatin from the broken-down collagen sets up in the fridge, and when you reheat it, that gelatin melts back into a luscious, concentrated sauce.
For tips on properly storing other cooked proteins, take a look at how long fried chicken lasts in the fridge or the best practices for keeping cooked rice fresh.
A Simple Braised Chuck Roast Recipe to Get You Started
Since chuck roast is the more popular pick, here’s a straightforward method that works every time.
What you need: A 3–4 pound chuck roast, salt, pepper, 2 tablespoons oil, 1 diced onion, 4 cloves garlic (minced), 2 cups beef broth, 1 cup red wine (or more broth if you skip the wine), 2 tablespoons tomato paste, carrots, potatoes, and fresh thyme or rosemary.
How to do it: Pat the roast dry with paper towels and season generously with salt and pepper on all sides. Heat oil in a Dutch oven over high heat until it’s almost smoking. Sear the roast for 3–4 minutes per side until a deep brown crust forms. Remove the meat and set it aside.
Drop the heat to medium. Add onion and cook for about 5 minutes until softened. Add garlic and tomato paste, stir for a minute until fragrant. Pour in the wine and broth, scraping up the browned bits from the bottom of the pot (that’s pure flavor — don’t waste it). Return the roast to the pot, toss in your herbs, cover with a lid, and slide it into a 300°F oven.
After about 2 hours, add your carrots and potatoes around the roast. Cover again and cook for another 1 to 1.5 hours until the vegetables are tender and the meat pulls apart with zero resistance.
Warning: Don’t open the lid every 30 minutes to check on it. Every time you lift that lid, you lose heat and moisture. Trust the process. Set a timer and walk away.
If you enjoy oven cooking and want to nail the technique for other proteins, the guide on how to bake chicken breast at 350°F covers similar principles about temperature control and timing.
FAQ
Can I use shoulder roast instead of chuck roast in a pot roast recipe?
Yes, you can. Shoulder roast will give you a leaner pot roast with a slightly firmer texture. Add about ½ cup extra braising liquid to compensate for the lower fat content, and don’t cook it longer than necessary — shoulder roast can dry out faster than chuck if overcooked. The flavor will be a bit cleaner and less rich, but still delicious.
Which cut is better for slow cooker recipes?
Chuck roast is the better slow cooker cut for most people. Its high fat and connective tissue content means it practically cooks itself over 8 hours on low heat. You get that classic “fall apart” texture with minimal effort. Shoulder roast works in a slow cooker too, but it benefits from being checked around the 6-hour mark so you don’t over-cook it into dryness.
Is shoulder roast or chuck roast healthier?
Shoulder roast is the leaner option, with roughly 30–40% less total fat per serving compared to chuck roast. If you’re focused on reducing saturated fat intake or cutting calories, shoulder roast is the smarter nutritional pick. Both cuts offer excellent protein — about 23–26 grams per 3-ounce cooked serving — along with iron, zinc, and B vitamins.
What temperature should I cook these roasts to?
For braising or slow cooking, pull either roast when the internal temperature reaches 195–205°F. At this range, the collagen has fully broken down into gelatin, and the meat will be tender and easy to shred or slice. Use a meat thermometer for accuracy rather than guessing by time alone.
Why is my roast tough even after hours of cooking?
Two common reasons. Either the oven temperature was too high (above 350°F causes the outside to tighten before the inside gets tender), or you didn’t cook it long enough. Tough roasts often just need more time. If you pull a roast at 180°F internal and it’s chewy, put it back — it needs to push past 195°F for the collagen to fully melt. Patience is everything with these cuts.
Pick Your Cut, Trust the Process
Shoulder roast and chuck roast are both honest, hardworking cuts of beef that reward patience and low-slow cooking. Chuck gives you richness, fat, and that crowd-pleasing fall-apart texture. Shoulder gives you a leaner, cleaner bite with slices that hold together and a flavor that lets your seasoning shine.
Neither one is objectively “better.” The right choice depends entirely on your recipe, your preferences, and what you want on the plate. Now that you know exactly how they’re different, you can walk up to that butcher counter with confidence, grab the right cut, and cook something your family talks about all week.
And honestly? Buy both sometime and do a side-by-side cook. That’s the most fun way to learn — and you get two roasts out of the deal.